12th Practical Class:
AI Prompting Guide for Developers
Modern AI Coding Tools Overview
Before we dive into Cursor specifically, it helps to understand where it fits in the current AI tooling landscape.
ChatGPT (Browser / App)
- What it is: A general-purpose conversational AI from OpenAI, great for explanations, brainstorming, and language tasks.
- Best for:
- Explaining concepts (TypeScript types, React hooks, algorithms)
- Drafting content (docs, emails, commit messages)
- High-level design discussions and debugging help
- Limitations:
- Not directly embedded in your editor by default
- Usually has only partial view of your code unless you paste or upload it
GitHub Copilot / Microsoft Copilot (Inline Assistant)
- What it is: An AI pair programmer integrated into editors like VS Code, Neovim, and JetBrains IDEs.
- Best for:
- Inline completions as you type
- Generating small functions or boilerplate quickly
- Simple refactors in a single file
- Limitations:
- Mostly focused on completion rather than multi-step workflows
- Less opinionated about project-wide architecture and conventions
Cursor (AI-First IDE)
- What it is: A VS Code–compatible IDE with AI deeply integrated into the editor, terminal, and project view.
- Best for:
- Multi-file refactors and feature implementations
- Understanding and navigating large codebases
- Encoding your team’s style guide and architecture into project Rules (for example, or )
- Combining inline completions, chat, and autonomous Agent workflows
- Key idea: Think of Cursor as a full AI development environment that can read, navigate, and modify your entire repo—ideal for the kind of projects you build in this course.
Introduction to Cursor
Cursor is an AI-powered code editor that has rapidly become the go-to IDE for TypeScript developers and modern web development. Built on top of VS Code, Cursor integrates AI assistance directly into your coding workflow, making it one of the most popular AI coding tools available today.
Why Cursor?
- TypeScript-first: Excellent support for TypeScript, React, and modern JavaScript frameworks
- Context-aware: Understands your entire codebase, not just the current file
- Seamless integration: Works like VS Code but with AI superpowers
- Growing popularity: Rapidly adopted by developers and teams worldwide
Core Concepts
Understanding Cursor's core concepts is essential for effective use. Based on the official Cursor documentation, here are the fundamental concepts:
Tab - Multi-line Autocomplete
Code completion that predicts multi-line edits. Press to accept suggestions based on your current code and recent changes. This is the fastest way to get code suggestions as you type.

Agent
An AI that can read and modify code across multiple files. Describe changes in natural language and Agent executes them. Agent can:
- Read and write files
- Run terminal commands
- Search the codebase
- Call MCP servers
- Perform web searches
- Handle multi-step processes
Inline Edit
Edit selected code with natural language. Press (Mac) or (Windows/Linux) to describe changes and see them applied in place. Perfect for targeted edits to specific code sections.
Chat
Interface for AI conversations supporting:
- Multiple tabs for different conversations
- Conversation history
- Checkpoints for saving progress
- Export functionality
Rules (Project, User, Team, AGENTS.md)
Rules provide persistent, system-level instructions to Agent. They encode your coding standards, architecture patterns, and workflows and are applied automatically as part of the model context.
- Project Rules: Stored as files under , version-controlled and scoped to your codebase.
- User Rules: Global preferences in that apply across all projects.
- Team Rules: Organization-wide rules managed from the Cursor dashboard (for team/enterprise plans).
- AGENTS.md: Simple markdown agent instructions you can put in the project root or subfolders as a lightweight alternative to .
See the official Rules docs for the full model.
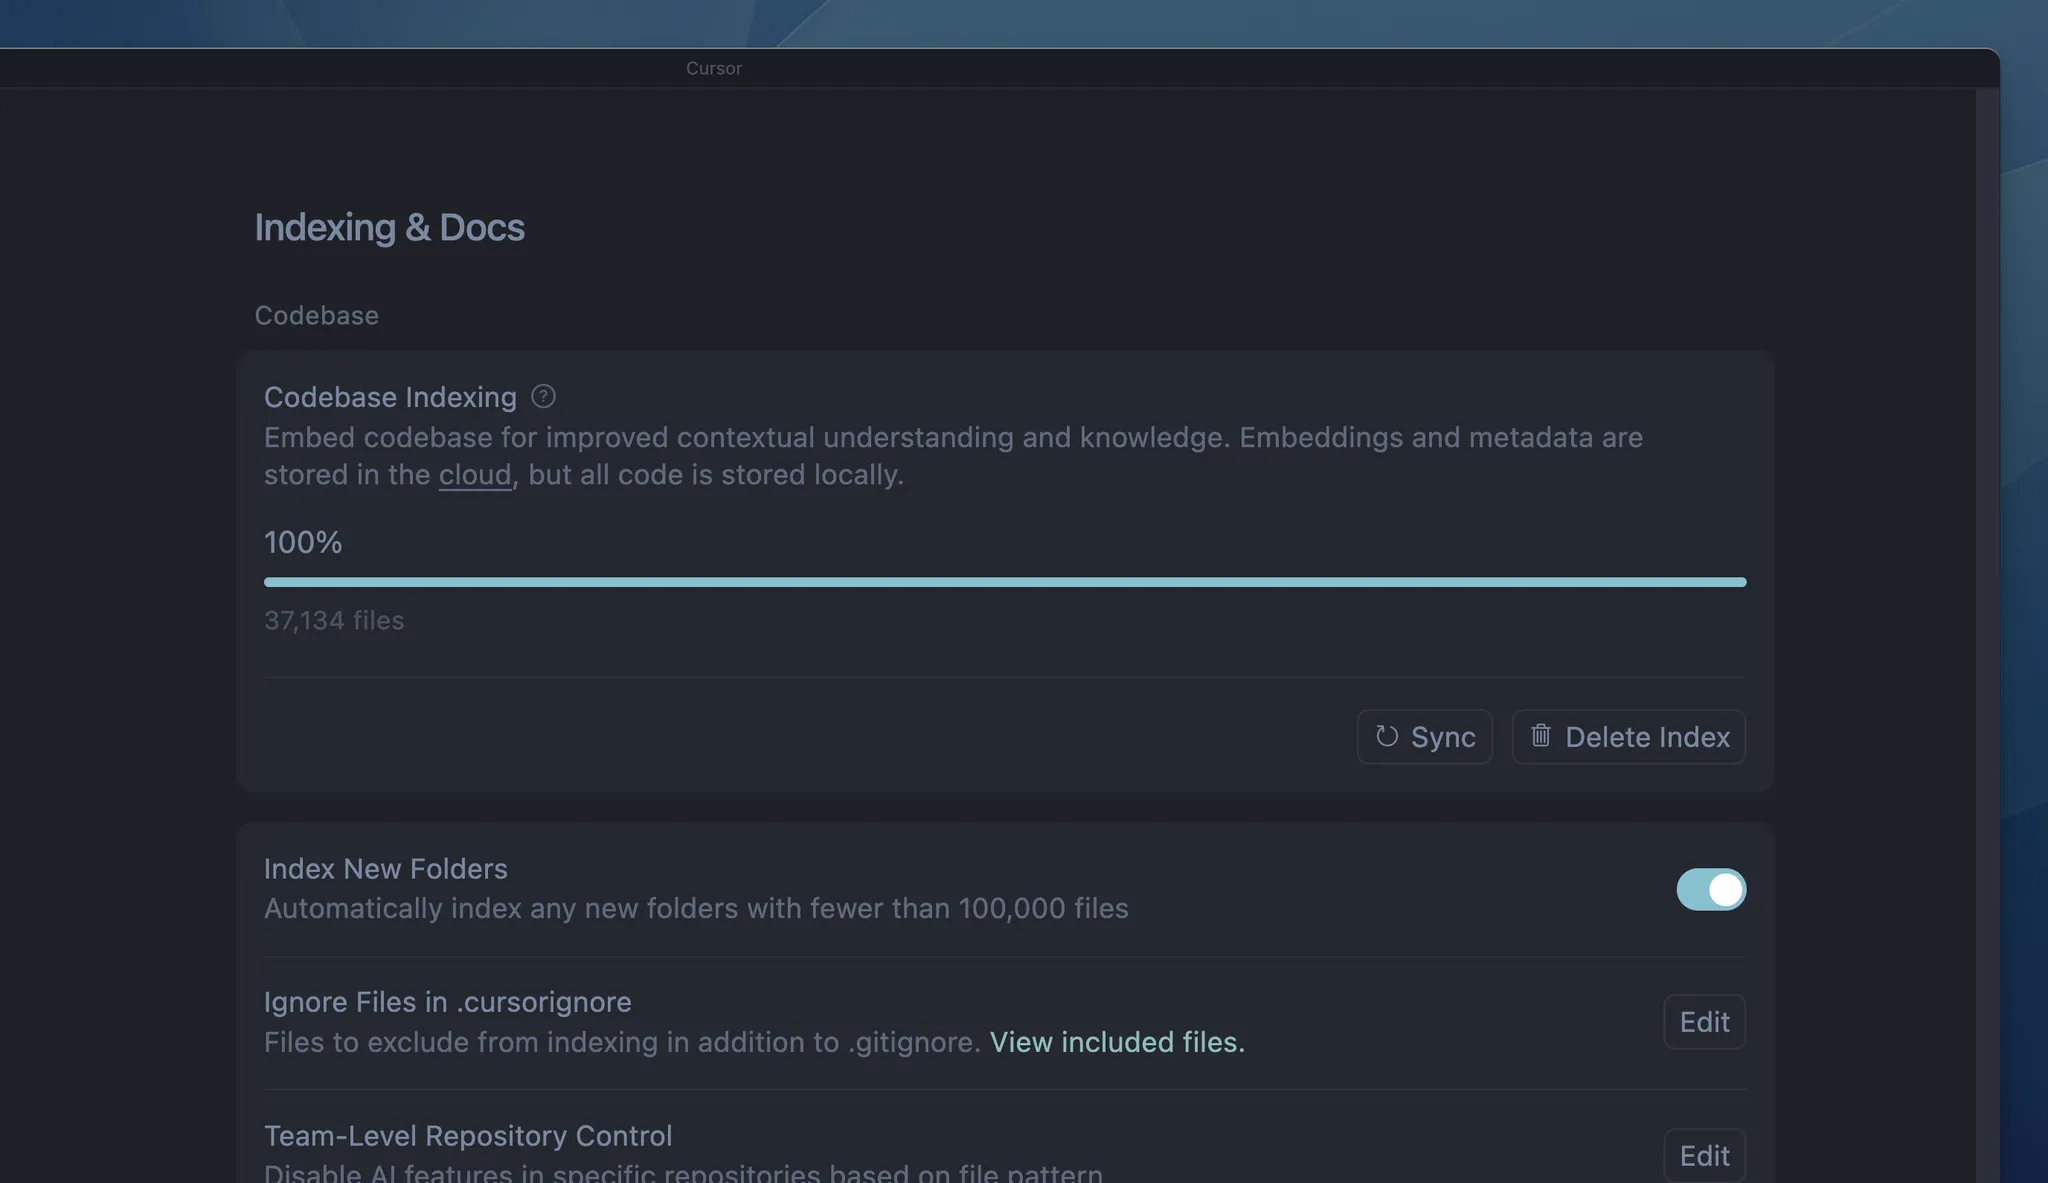
Codebase Indexing
Semantic analysis of your codebase enabling:
- Code search
- Reference finding
- Context-aware suggestions
Cursor automatically indexes your codebase to understand structure and relationships.
MCP (Model Context Protocol)
Model Context Protocol is a standardized way to connect Cursor to external tools and services. Think of MCPs as plugins that give Cursor superpowers beyond just reading your code.
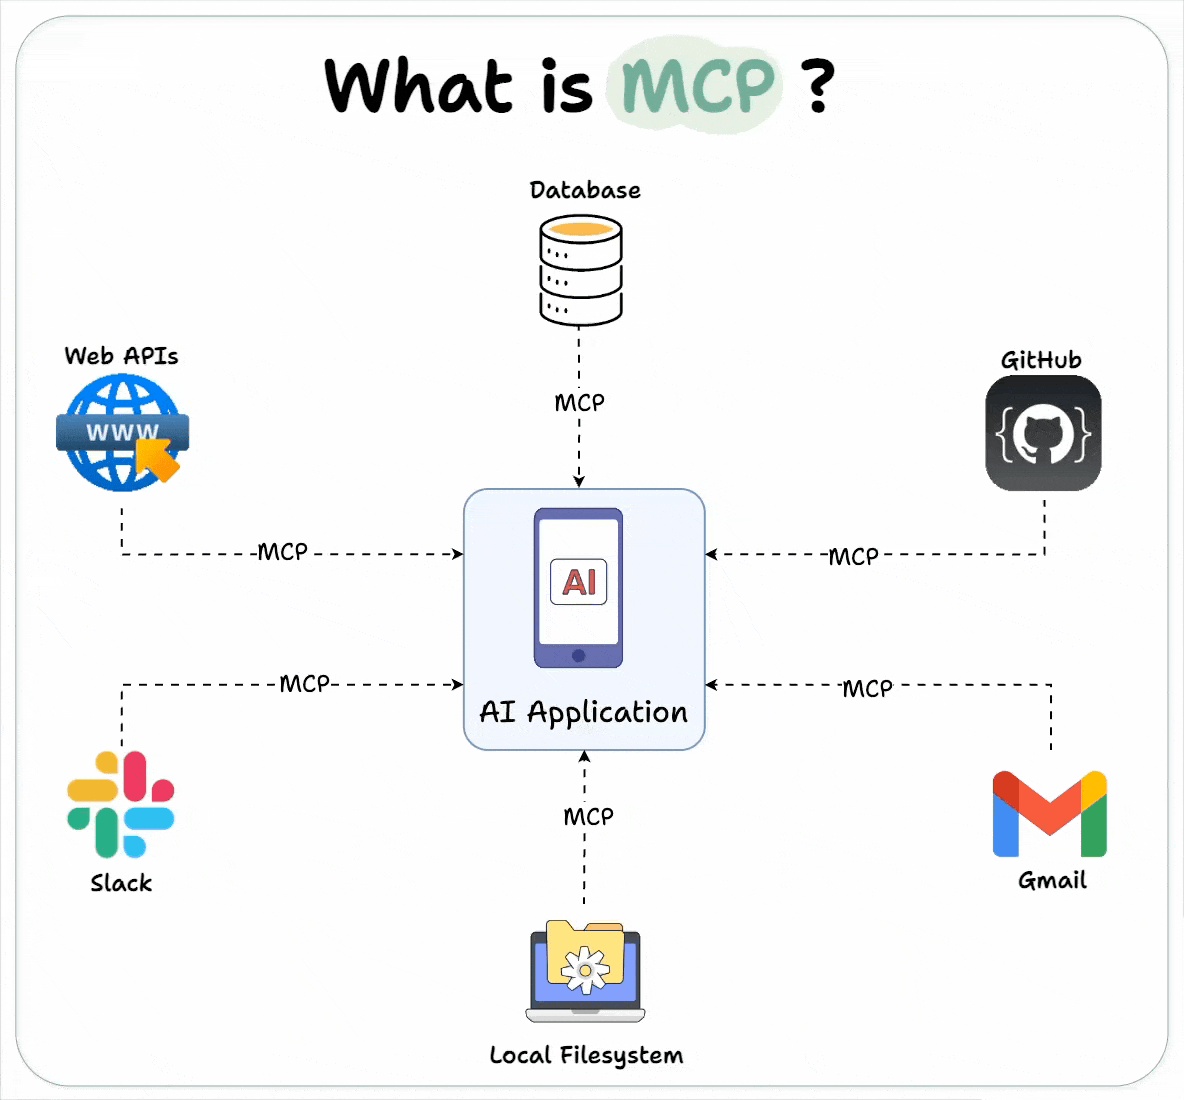
What MCPs can do:
- Database connections: Query your database directly from Cursor (PostgreSQL, MySQL, SQLite)
- API access: Connect to external APIs and services
- Documentation: Access up-to-date docs from libraries like Better Auth, React, etc.
- Design tools: Import designs from Figma directly into code
- File systems: Access remote files and cloud storage
- Custom tools: Build your own MCPs for specialized needs
Popular MCPs:
- Better Auth MCP: Get Better Auth documentation and examples
- Figma MCP: Convert Figma designs to code
- PostgreSQL MCP: Query and manage your database
- GitHub MCP: Access repository information
- Slack MCP: Search and access Slack messages
How to use MCPs:
- Install an MCP from the Cursor settings
- Configure it with necessary credentials (API keys, etc.)
- Use it in Agent mode - just ask Agent to use the MCP
- Example: "Use the Figma MCP to convert this design to React code"
MCPs make Cursor context-aware of your entire development ecosystem, not just your code.
Risks when using MCP servers
MCPs are powerful plugins. Use them like production integrations.
- Over‑privilege: broad DB/API scopes → data leaks/destructive writes
- Prompt injection: untrusted sources can trigger unwanted calls
- Network reach: SSRF/bridging into internal services
- Cost/quotas: automated calls can blow limits
- Privacy: PII/regulated data pulled into context
- Supply chain: third‑party servers may be compromised
Mitigations
- Verified servers only: use only verified MCP servers
- Least privilege: read‑only by default; separate read/write configs
- Human‑in‑loop: keep Agent in Auto; confirm write/destructive steps
- Network limits: restrict endpoints; sandbox self‑hosted servers
- Secrets: store/rotate keys; never paste in chat
- Validate & review: schema/guards; review diffs before apply
- Budgets & logs: rate limits/quotas; enable audit logs
See the official MCP docs.
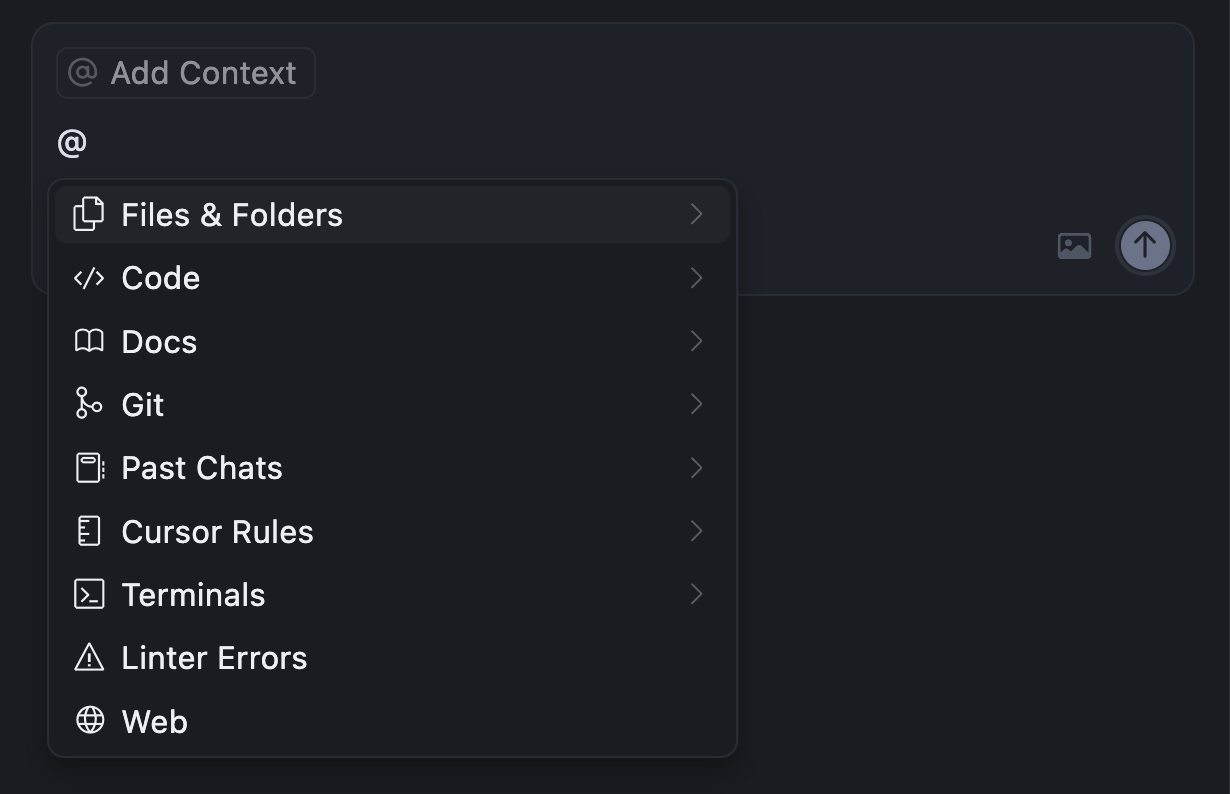
Context
Information provided to AI models during code generation, including:
- Files (open files, referenced files)
- Symbols (functions, classes, types)
- Conversation history
- Rules and memories
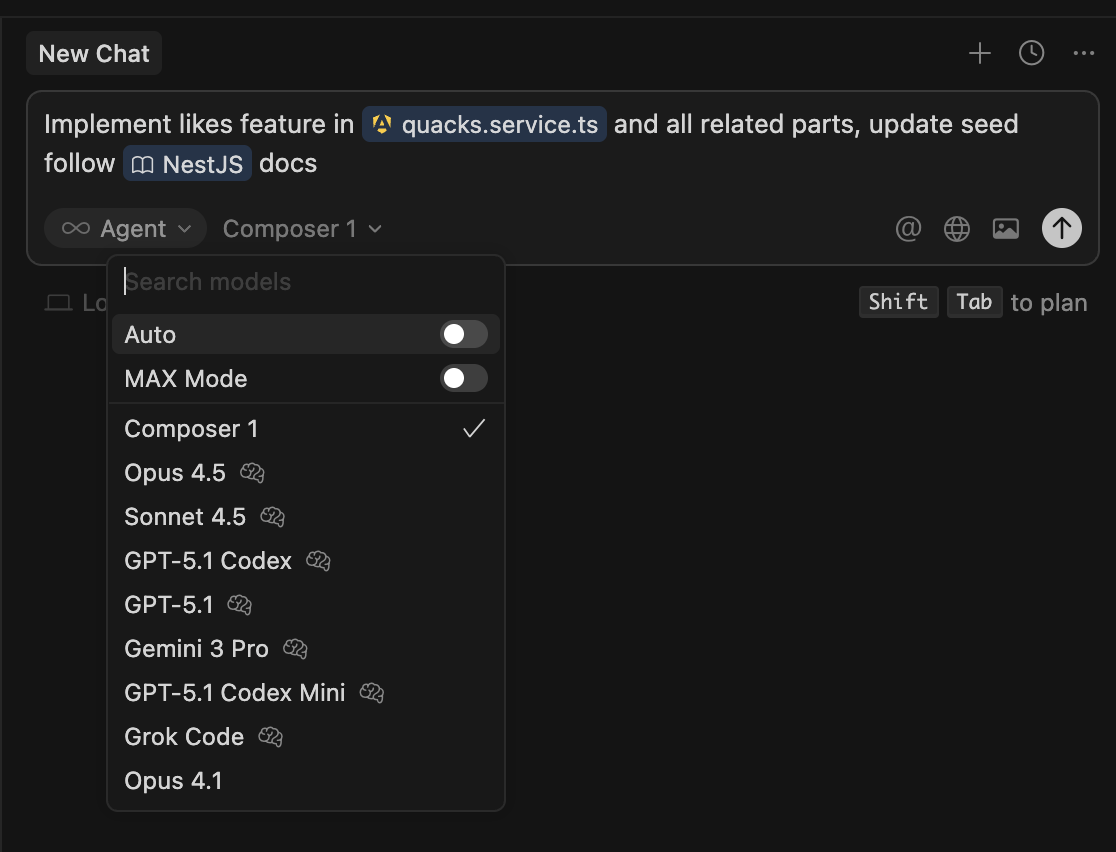
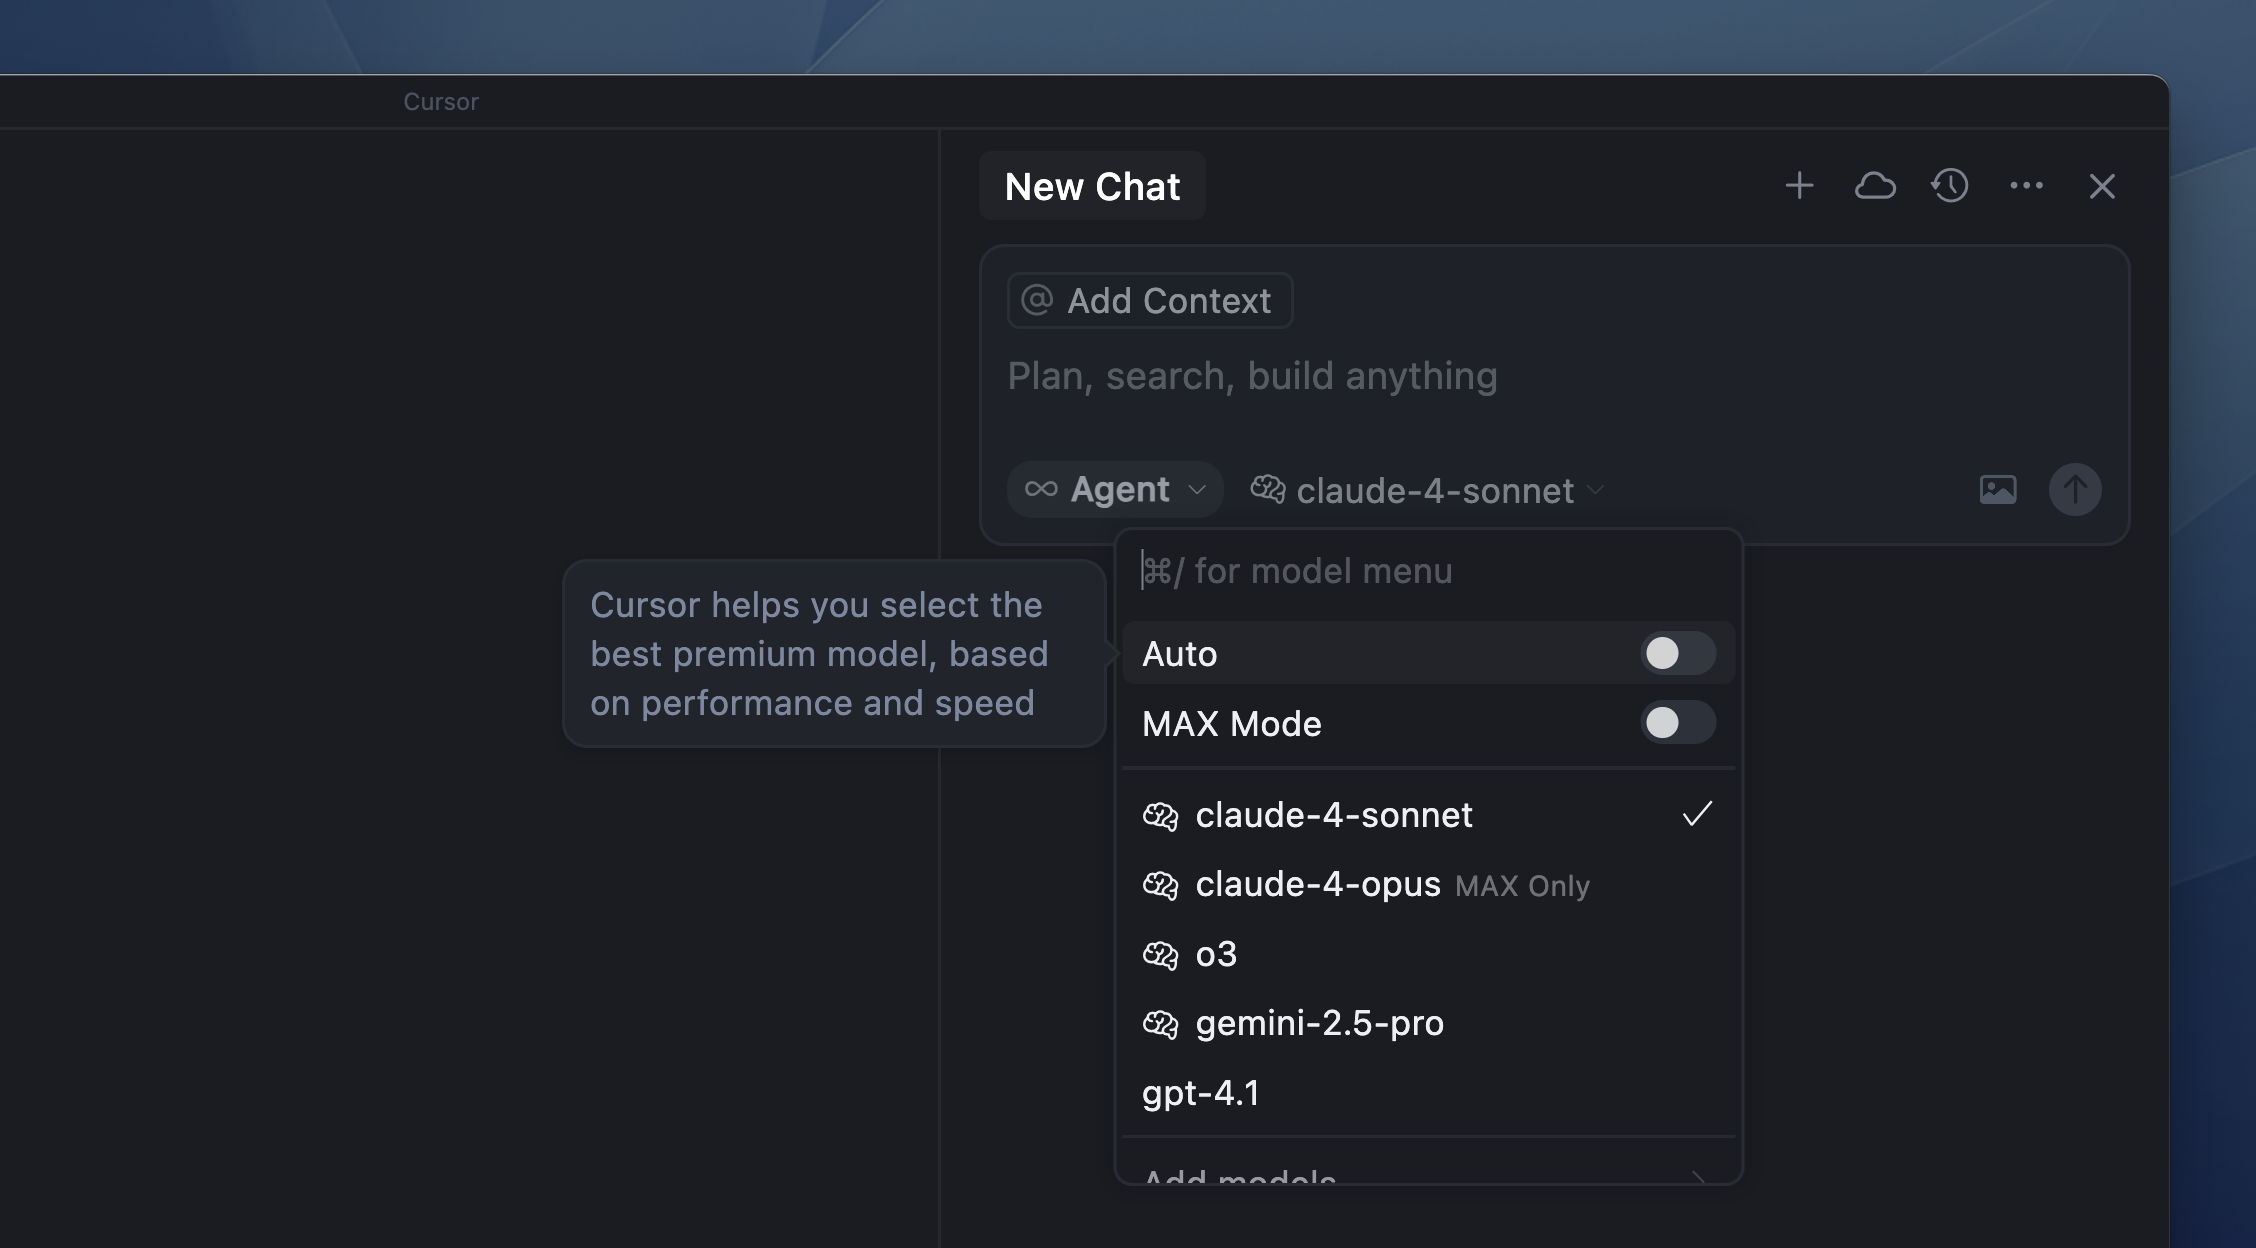
Models
Different AI models are available for both thinking (deep analysis) and implementation (code editing), each with different speed and capability characteristics. You can select models per conversation, per edit, and per mode (Ask vs Agent).
Core Cursor Features
Cursor provides three main ways to interact with AI:
1. Tab - Multi-line Autocomplete
What it is: Cursor's autocomplete model provides intelligent code suggestions as you type.
- Trigger: Automatically appears as you type (or press to accept)
- Best for: Quick code completion, writing code incrementally
- Model: Fast, lightweight autocomplete model
- Context: Uses nearby code and file context
Usage: Simply start typing, and Cursor will suggest multi-line completions based on your codebase patterns.
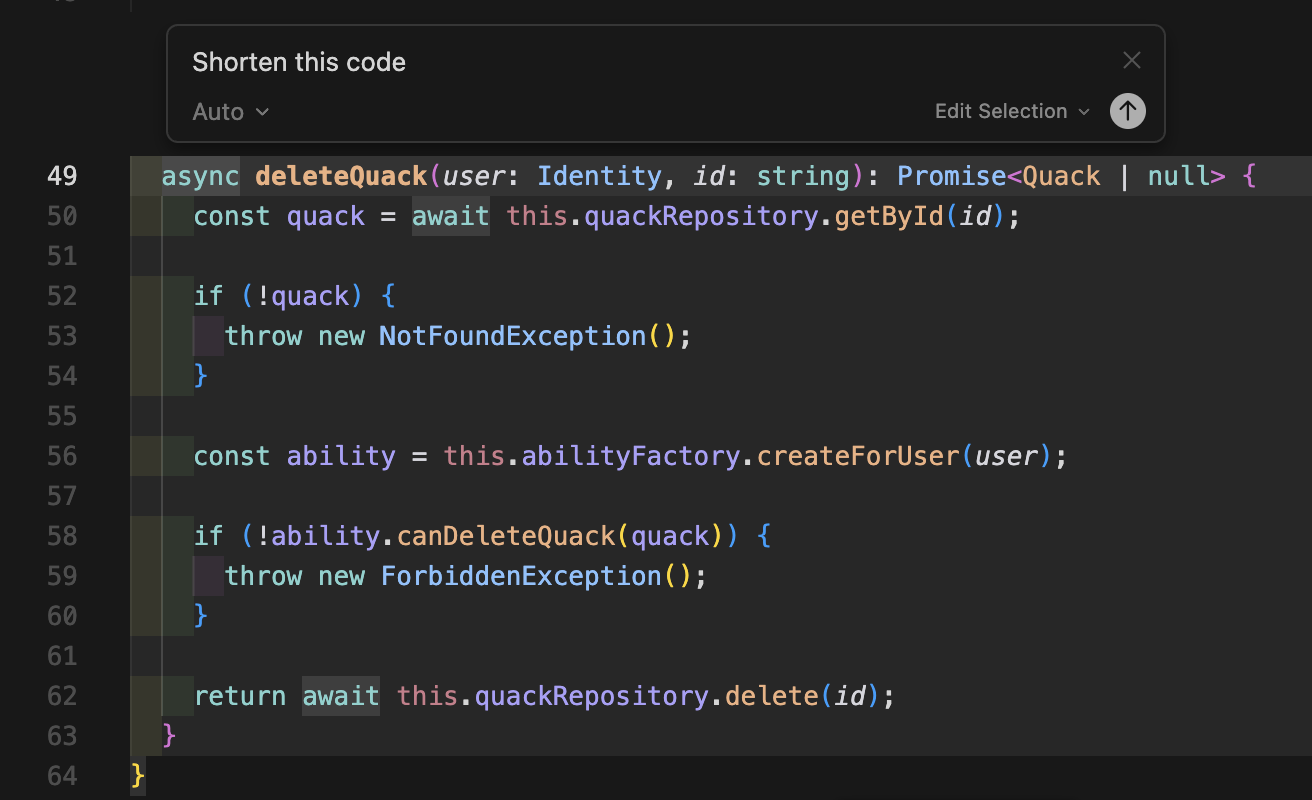
2. Ctrl+K - Inline Edit
What it is: Edit a specific selection of code using natural language instructions.
- Trigger: Select code → Press (or on Mac)
- Best for: Refactoring, fixing bugs, modifying specific code sections
- Model: Uses your selected model (Claude Sonnet 4.5, GPT-4o, etc.)
- Context: Understands the selected code and surrounding context
Example: Select a function, press , type "Add error handling and logging", and Cursor will rewrite the function accordingly.
3. Chat with Agent - Full Agent Mode
What it is: A powerful AI agent that can make changes across multiple files, run commands, and test code.
- Trigger: Open Chat panel → Select "Agent" mode
- Best for: Complex features, multi-file changes, complete implementations
- Model: Uses implementation models (Claude Sonnet 4.5, GPT-4o)
- Context: Full codebase awareness, can read and modify multiple files
Understanding Cursor Modes: Ask and Agent
Cursor provides two main modes for interacting with AI:
Ask Mode (Read-Only)
Purpose: Ask questions and explore your codebase without making changes.
- Models: Uses thinking variants of models (for example, Claude Sonnet "Thinking" or GPT-4o "Thinking") for deeper reasoning
- Behavior: Analyzes code, provides explanations, answers questions, suggests approaches
- No code changes: Read-only - only provides information and suggestions
- Best for:
- Understanding how code works
- Getting explanations of complex logic
- Debugging and troubleshooting
- Learning and exploration
- Planning before implementation
Example: "How does the authentication flow work?" or "What's the best way to add a likes feature?"
Agent Mode (Implementation)
Purpose: Actually write and modify code autonomously.
- Models: Uses implementation models (for example, Claude Sonnet or GPT-4o) for code generation
- Capabilities:
- Makes code changes across multiple files
- Creates and modifies files
- Runs terminal commands
- Searches the codebase
- Calls MCP servers
- Performs web searches
- Handles multi-step processes autonomously
Working with Agent: Direct vs Plan Approach
Agent can work in two ways:
1. Direct Approach (Default)
- Give Agent a task and it starts implementing immediately
- Best for: Simple, straightforward tasks
- Example: "Add error handling to this function"
2. Plan Approach (Press )
- Agent creates a detailed plan before implementing
- You can review and edit the plan before execution
- Best for: Complex features with multiple steps
- Example: "Add a complete likes feature with backend and frontend"
How the Plan Approach works:
- Press when writing your prompt (or toggle Plan mode)
- Agent researches your codebase thoroughly
- Creates a structured, step-by-step plan
- Shows you the plan for review
- You can edit the plan - add, remove, or modify steps
- Once approved, Agent implements the plan
When to use the Plan Approach:
- Complex features (multiple files, dependencies)
- Large refactoring tasks
- When you want to review before implementation
- Tasks requiring careful coordination
Example workflow:
Key insight: Plan mode isn't a separate mode - it's just Agent being more thoughtful and giving you a chance to review before acting.
The Recommended Workflow
For effective development, combine Ask and Agent modes:
-
Ask Mode: Understand the codebase and requirements
- "How does the current Quack module work?"
- "What patterns are used for GraphQL mutations?"
-
Agent with Plan enabled (for complex features):
- Press to enable planning
- "Add a likes feature to Quacks"
- Review and edit the generated plan
- Approve to proceed with implementation
-
Agent without Plan (for simple tasks):
- "Add error handling to this function"
- Agent implements immediately
The key is choosing the right approach for the task complexity: Ask for understanding, Agent + Plan for complex work, Agent direct for straightforward edits.
Agent Tools and Capabilities
Agent has access to various tools that enable it to work autonomously:
Tools Available to Agent
File Operations:
- Read files from your codebase
- Write and modify files
- Create new files
- Delete files (with confirmation)
Terminal Commands:
- Run shell commands
- Execute build scripts
- Run tests
- Install packages
Codebase Search:
- Semantic code search
- Find references and definitions
- Search across the entire codebase
MCP Servers:
- Call external tools via Model Context Protocol
- Access databases
- Query APIs
- Import from Figma, documentation, etc.
Web Search:
- Search the internet for up-to-date information
- Find documentation
- Look up best practices
Reviews - Code Review Process
When Agent makes changes, it can:
Automatic Reviews:
- Agent reviews its own changes before applying them
- Checks for common issues
- Validates against project rules
Manual Reviews:
- In Auto mode, Agent shows you changes before applying
- You can review, approve, or request modifications
- Changes are highlighted for easy review
Review Workflow:
- Agent proposes changes
- You review the diff
- Approve, reject, or request modifications
- Agent applies approved changes
Browser Testing
Agent can test your application in a browser:
Capabilities:
- Open your application in a browser
- Navigate through pages
- Interact with UI elements
- Verify functionality
- Take screenshots
- Test user flows
When it's used:
- After implementing frontend features
- To verify UI changes work correctly
- To test user interactions
- To ensure features are working end-to-end
Example: After implementing a login form, Agent can open the browser, navigate to the login page, and test that the form works correctly.
Security Features
Cursor has built-in security measures to protect sensitive information:
Environment Files Protection:
- Cursor typically won't peek into files automatically
- Environment variables are protected from being read by Agent
- This prevents sensitive credentials from being exposed
File Exclusions:
- Certain files are excluded from indexing by default
- Sensitive files like , , are protected
- Private keys and credentials are not indexed
Best Practices:
- Never commit files (they should be in )
- Use environment variable management tools
- Be cautious when explicitly asking Agent to read sensitive files
- Review what files Agent is accessing before approving changes
What's Protected:
- files and variants
- Private keys (, files)
- Configuration files with secrets
- Files listed in or
Note: While Cursor protects these files by default, always be cautious and review what Agent is doing, especially when it needs to access configuration files.
Inline Edit (Ctrl+K) Deep Dive
The inline edit feature is one of Cursor's most powerful tools:
How It Works
- Select code: Highlight the code you want to modify
- Press Ctrl+K: Opens inline edit prompt
- Describe changes: Type what you want in natural language
- Review & accept: Cursor shows the changes, you accept or modify
Examples
Refactoring:
Bug Fix:
Feature Addition:
Tips for Inline Edit
- Be specific: Clear instructions yield better results
- Select enough context: Include related code for better understanding
- Iterate: Make small changes, then build on them
- Use with Agent: Combine inline edits with agent mode for complex features
Rules in Cursor (Project Rules, AGENTS.md, Legacy )
Cursor uses Rules to give Agent persistent guidance across projects (official docs):
- Project Rules: files scoped to parts of your repo
- AGENTS.md: Plain markdown agent instructions
- User Rules: Global preferences in your Cursor settings
- Team Rules: Organization-wide rules managed from the Cursor dashboard
Rules are applied to Agent (Chat). They do not affect Tab autocomplete or Inline Edit (Cmd/Ctrl+K), which is consistent with the official FAQ in the Rules docs.
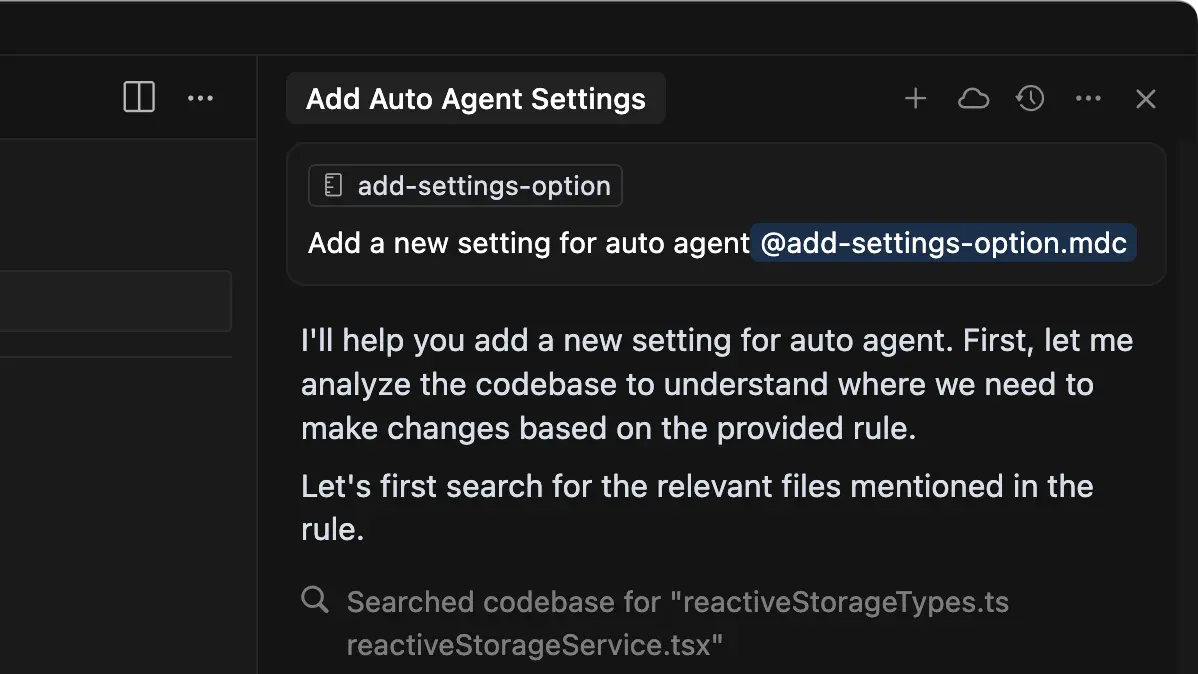
Project Rules:
Project Rules live in directories and are written in MDC (), which supports optional metadata and markdown content. They are version-controlled and can be scoped to the whole repo or to specific subdirectories.
Use Project Rules to:
- Encode domain-specific knowledge about your codebase
- Standardize architecture decisions and style
- Automate project-specific workflows or templates
Example Project Rule (simplified)
AGENTS.md
is a simpler, plain-markdown alternative. Place it in your project root (and optionally in subfolders) when you want straightforward, human-readable instructions without MDC metadata.
For student projects, is often the fastest way to teach Cursor how you want the code to look and feel.
User and Team Rules
- User Rules live in and define your personal preferences (for example, “be concise”, “prefer React + TypeScript examples”).
- Team Rules are managed from the Cursor dashboard and apply to everyone on the team, ensuring consistent standards across company projects.
(legacy)
The older single-file in the project root is still supported but is explicitly marked as legacy and will be deprecated in the Cursor docs.
For new projects, prefer Project Rules in or , and gradually migrate any existing content into those newer mechanisms.
MCPs (Model Context Protocol)
MCPs allow Cursor to connect to external tools and services in a standardized way:
- Better Auth MCP: Access Better Auth documentation and examples
- Figma MCP: Import designs directly into code
- Database MCPs: Query databases, generate migrations
- Playwright MCP: End-to-end testing
- Custom MCPs: Build your own integrations (internal tools, proprietary APIs, etc.)
In practice, MCPs are most useful when you want Cursor to:
- Answer questions using up-to-date documentation
- Interact with your actual data (for example, a Postgres database used in a project)
- Bridge the gap between design (Figma) and implementation (React / Tailwind)
MCPs extend Cursor's capabilities beyond just code generation—they enable it to interact with your entire development ecosystem.
Working with Documentation in Cursor
Cursor provides multiple ways to work with documentation while you code:
- : Ask questions about official documentation for popular tools and frameworks (for example, React, Next.js, TanStack Query, Better Auth). Cursor routes the question through the appropriate MCP-backed doc source.
- : Run a live web search when you need the latest information (for example, library changelogs or breaking changes).
- Internal docs via MCP: You can expose private documentation (Confluence, internal wikis, ADRs, etc.) through MCP, so Cursor can answer questions using your company's knowledge base.
For students, the most important takeaway is: you can and should ask Cursor about docs instead of constantly alt-tabbing—but always skim the underlying source it cites to build your own understanding.
Complete Feature Development with Cursor
One of Cursor's most impressive capabilities is generating complete, production-ready features including:
✅ Backend implementation (GraphQL resolvers, services, types)
✅ Frontend implementation (components, hooks, queries)
✅ Database migrations (Prisma schema changes)
✅ Unit tests (Vitest, React Testing Library)
✅ Integration testing (browser automation)
✅ Documentation updates (README, code comments)
✅ Code review (linting, formatting, best practices)
The Workflow
- Start with Ask mode: Understand the codebase and requirements
- Use Agent mode with Plan approach: For complex features, press to get a plan first
- Review and approve the plan: Edit if needed, then let Agent implement
- Review changes: In Auto mode, Agent asks before applying changes
- Iterate with inline edits: Refine specific parts with Ctrl+K
- Test and review: Always review generated code
- Update .cursorrules: Add new patterns if needed
Example: Adding Likes Feature to Quacker
Let's see a practical example of implementing a complete feature using Cursor effectively.
Step 1: Understanding (Ask Mode)
Start with Ask mode to understand the codebase:
Step 2: Implementation with Planning (Agent Mode)
For this complex feature, use Agent mode with the Plan approach ():
Agent will:
- Research your codebase thoroughly
- Create a detailed, step-by-step plan
- Show you the plan for review
- You can edit the plan before approving
- Once approved, Agent implements everything
Alternative: Direct Implementation (Agent Mode)
If you prefer to give Agent all the details directly (without planning first), you can use the direct approach:
Step 3: Refinement (Inline Edit)
Use Ctrl+K for specific refinements:
What Cursor Will Do
- Analyze the existing Quack module structure
- Create Prisma migration for Like model
- Implement backend resolver, service, and repository
- Update GraphQL schema and types
- Create frontend like button component
- Add GraphQL mutation hook
- Write unit tests
- Test in browser (if Background Agent is enabled)
- Update documentation
Real-World Example: Plan Mode in Action
Here's a video recording of implementing the likes feature using Agent mode with Plan approach ():
Setup and Context
Before starting:
- No or project rules were configured
- We specifically asked the AI to not run migrations automatically (to review them first)
- We explicitly requested browser testing to verify the implementation
Model used: Composer 1 in Max mode (more expensive, pay-per-use, but with much larger context window for better codebase understanding)
What Went Well ✅
- Plan creation: Agent successfully created a detailed, structured plan for the feature
- Multi-file coordination: Agent handled changes across multiple files (backend and frontend)
- Pattern recognition: Agent understood the existing codebase structure and patterns
- Persistence: When encountering issues, Agent eventually found solutions after some iteration
- Complete implementation: The feature was successfully implemented end-to-end
What Went Wrong ❌
-
Got stuck on issues: Agent encountered some problems that took multiple attempts to resolve, requiring manual intervention and guidance
-
Browser testing limitations: Cursor's browser testing feature is not very mature yet. Agent was unable to properly fill in the login form during testing, limiting the effectiveness of automated browser verification
-
Pattern adherence: Agent didn't always follow project patterns perfectly:
- Created helper functions inline in seed files instead of extracting them to separate utility functions
- Added likes service to the existing quacks module rather than creating a separate likes module (which might have been preferred for better separation of concerns)
-
Unit test issues: Agent attempted to create a unit test but failed to fix syntax errors in it, requiring manual correction
-
Manual handling required: Despite using Max mode (more autonomous), the process still required significant manual oversight and intervention throughout
Key Takeaways
Time taken: Including all issues, pauses, and manual interventions, the complete implementation took 26 minutes (video is sped up for viewing).
The importance of Rules: This example demonstrates why having proper or project rules in place is crucial. With better guidance about:
- Project structure preferences (separate modules vs. services within modules)
- Testing patterns and conventions
- Code organization standards (helper functions, utilities)
The implementation would likely have been significantly faster and required less manual intervention. Rules help Cursor understand your team's preferences and avoid common pitfalls.
Recommendation: Set up project rules ( or ) early in your project to guide Cursor's behavior and reduce the need for manual corrections.
Tips for Effective Prompting
- Start with Ask mode: Understand the codebase before making changes
- Use Plan approach () for complex tasks: Get a structured plan first
- Be specific: Include exact field names, types, and requirements
- Reference existing patterns: "Follow the same pattern as addQuack"
- Include edge cases: "Handle duplicate likes gracefully"
- Specify testing: "Add tests for X, Y, Z scenarios"
- Mention styling: "Match existing component styles"
- Break down complex features: Let Agent create a plan, then review it
- Use Auto: Let Agent propose diffs, but always review before applying
- Edit plans before approving: Refine the plan when Agent shows it to you
Best Practices
Do's ✅
- Start with Ask mode to understand the codebase
- Use Plan approach () for complex features to get structured plans
- Edit plans before approving - refine them when Agent shows you the plan
- Use Auto - keep Agent interactive and review changes before applying
- Use inline edits (Ctrl+K) for quick, targeted refinements
- Use specific, detailed prompts for better results
- Review generated code before committing
- Iterate on prompts - refine based on results
- Use Rules ( or AGENTS.md) to maintain consistency
- Test thoroughly - even if Cursor tests it
Don'ts ❌
- Don't blindly accept all generated code
- Don't use vague prompts like "add a feature"
- Don't skip code review - AI can make mistakes
- Don't forget to test - always verify functionality
- Don't ignore project conventions - update your Rules ( / AGENTS.md)
- Don't use Max without understanding the changes it might apply
- Don't skip planning - use Ask mode first, then Plan approach for complex features
- Don't skip reviewing plans - always review and refine before approving
- Don't ignore security - be aware of what files Agent is accessing, especially sensitive ones
Advanced: Multi-Step Features
For complex features, break them into steps:
Use Ask mode to understand, then Agent mode with Plan approach () to create a structured plan. Review and approve the plan, then Agent implements it. With Auto mode enabled, you'll review changes before they're applied.
Pricing Considerations
- Free tier: Limited requests per month
- Pro tier: More requests, better models, Background Agent
- Business tier: Team features, more usage, advanced features
- Tip:
- Use Tab autocomplete for quick completions (doesn't count against limits)
- Use Ask mode efficiently - plan before implementing
- Use Agent mode strategically - for complex multi-file changes
- Inline edits (Ctrl+K) are efficient for targeted changes
Conclusion
Cursor is a powerful tool that can dramatically accelerate development when used correctly. The key is:
- Understanding the different modes (Ask vs Agent) and approaches (Direct vs Plan, Auto vs Max)
- Using the right tool for each task (Tab, Ctrl+K, or Agent)
- Writing effective prompts that are specific and detailed
- Reviewing and refining the generated code
- Using .cursorrules to maintain consistency
- Iterating on your prompting skills
Remember: Cursor is a pair programming partner, not a replacement for understanding code. Always review, test, and understand what it generates!
Quick Reference
- Tab: Multi-line autocomplete (fast, lightweight)
- Ctrl+K: Inline edit selection (targeted changes)
- Ask Mode: Questions and exploration (thinking models, no code changes)
- Agent Mode: Implementation (code changes, runs commands, uses tools)
- Direct approach: Agent starts immediately
- Plan approach (): Agent creates plan first, you review, then it implements
- Auto: Agent stays interactive and usually asks before applying changes
- Max: Agent is more autonomous; you review after it has done more work
- MCPs: Connect to external tools (databases, APIs, docs)
- Tools: Agent can use file operations, terminal, search, MCPs, browser
- Reviews: Code review process before applying changes
- Browser Testing: Agent can test your app in browser
- Security: files and sensitive data are protected
Mode Selection Guide
- Need to understand code? → Use Ask Mode
- Complex feature with many steps? → Use Agent Mode with Plan enabled ()
- Simple, straightforward task? → Use Agent Mode directly
- Quick single-file edit? → Use Ctrl+K (Inline Edit)
- Code completion as you type? → Use Tab autocomplete