Basics of Backend
We will use NestJS, arguably currently the most popular backend framework for Node.js. It provides a lot of functionality, modularity, and predefined way of writing code out of the box which is ideal for building applications within a team.
Your code templates both for the practical classes and the final project are already set up for you. The quacker app template is based on a real-world project template just simplified so that you can get up to speed as fast as possible (even though there are concepts you should learn first to understand how all of it works).
Basic Architecture

Example
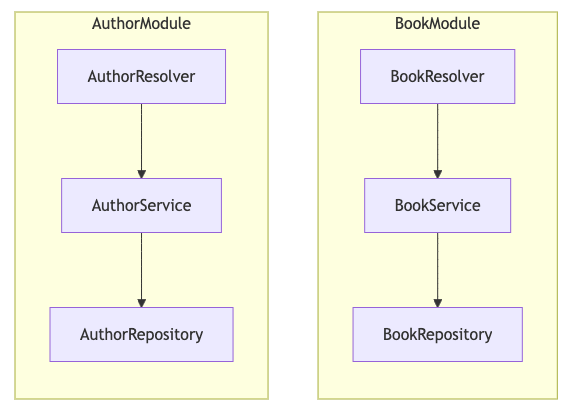
Resolvers
This is where the GraphQL resolvers are defined, aka the presentation layer, aka how we "present" data to the client (and how we get data from the client).
Basic resolver can look like this: (the code examples here are very simplified, just to get the idea across)
Domain layer & services
This is where the business logic is defined, aka processing what the client asks for, checking permissions, calling data getters/setters etc.
We will use "domain" for this, "services" is also common.
Repositories
This is where the data is fetched from and stored and nothing else, aka the data access layer, aka the repository layer (persistence layer).
Putting it all together in a NestJS module
In NestJS, basically everything we use is a part of a module. Modules are way to organize code into distinct parts based on what they do.
Usually there are modules that are reused in multiple places like database connection, authentication, permissions, etc. These are usually imported in other modules.
Then there are modules that are specific to a feature. These are usually imported in the module that uses them.
Quack is a feature module:
If we look back at the QuackResolver, we can see that it depends on the QuackService. Thanks to both QuackResolver and QuackService being providers in the QuackModule, NestJS automatically gives us a QuackService instance in the QuackResolver.
Example module directory tree
App Module
App Module is the root module that imports all other modules that the application use.
Starting the server
Bootstrapping is the process of creating the application instance and starting it.
In NestJS, we can use the class to create the application instance from the AppModule and then start it.
This is how it's done in a regular NestJS application, in your project template you have a bit of an improved version of this (which we can dive into another time, you most likely won't need it)
At this point you already have a working and running NestJS application.
GraphQL
We can use the Apollo Sandbox to test the GraphQL API.
Usually available at path
Live coding
Let's create some new modules ourselves to get a hang of it
We will get back to the example from the beginning of this class.
Let's start by creating a new module for Books.
Let's first create a repository for the Book. Let's say for now that a Book has an id and a title.
Register the providers in the module:
Import the BooksModule in the AppModule:
This immediately gives us a working GraphQL API for the mocked Books.
What this generates for us is this GraphQL schema:
Since we're using NestJS's code-first approach, we basically skip having to work with the schema file. However it's important to understand what it does. GraphQL schema basically defines the shape of the data that can be fetched from the server. This schema tells us that we can query the books endpoint and it will return a list of books. Each book will have an id and a title (we can choose if we want to fetch only title or only ID or all fields). ID is a special type in GraphQL.
! marks non-nullable fields. If the server tries to return null for any of these fields, it will throw an error.
Mutations
This of course is very limited because the only thing we can do is list all books. We will of course want to be able to add, update and delete books as well. For this we need to define mutations.
Query vs Mutation
In GraphQL the main 2 types of operations are queries and mutations.
Queries are used to read data from the server. Mutations are used to write data to the server.
There is no difference in how we use them, this is mostly a soft distinction between what we use them for. In general mutations are requests that modify data on the server (creating, updating, deleting) while queries only read them.
The only practical difference is that if we call multiple queries and multiple mutations in one GraphQL requests, queries are executed in parallel while mutations are executed sequentially (one after another).
Why? Practical example: let's imagine we have a room with AC that has it's own GraphQL API (for some reason) and we want to have a way to restart it remotely, but it only has turn off and turn on mutations. We then can do this:
If we used queries for this we wouldn't know if it's gonna stay off or on after this is sent to the server.
Now let's define a mutation for adding a book. We will add the repository and service functions first.
This enhances our GraphQL schema to this:
The mutation will be available in the Apollo Sandbox and we can use it to add a book.
@Args is a decorator that allows us to extract the arguments from the GraphQL request. However it's not a good practice to use it like this. For mutations especially we should group the variables into an input type.
This modifies the GraphQL schema to this:
We can now use it in the Apollo Sandbox like this:
The point of this is to
- have better readability of the code
- be able to add new fields to the input type easily without having to change the mutation.
- Potentially be able to reuse input type across multiple mutations (but it might be a better practice to create a separate input type for each mutation)
This principle of using object types for arguments instead of separate values is actually a good practice in general. You should do the same thing for services, repositories etc. But avoid doing this!
This is a common mistake which makes your domain layer depend on the graphql layer.
e.g.:
Now we can use this and have no dependency on the graphql layer.
In repositories it's generally fine and I'd argue recommended to use the domain classes because the point of them is to keep database separated from them. Everything should sort of "depend" on the domain layer. It might be confusing because here obviously service depends on the repository but that doesn't present much problems for an application of this scale. In real-world there are a lot more advanced patterns that deal with this which won't be covered in this course.
Having this will make it very easy to be switching between different database providers (like what we're going to have to do soon when we stop using the in-memory arrays) without having to change any code outside of the repository.
You will of course run into cases where the shape of the graphql response and the domain object are not compatible and you will have to manually map them. In that case it is recommended to create a mapper function, something like this:
Authors and relationships
We will assume a book can have multiple authors.
Let's create an author module now, same as with books.
Domain classes
Repository
Service
GraphQL types
Resolver
Module
Don't forget to add the to your :
Now you can test the authors functionality in the GraphQL playground:
Relations in GraphQL
GraphQL Object Types (in our case its BookType and AuthorType) can have fields that are other Object Types.
We should NOT do that though, because this doesn't really do anything for us and we would have to be fetching authors in the book service somehow and that' obviously not a good practice.
Bear with me here:
The best practice is to instead create a new resolver for BookType in the AuthorsModule.
Why?
If you think about it, what we need to do to fetch book's authors is simply get authors filtered by book's author ids. So we are effectively not working with Book but only with Authors here -> BookAuthors relation belongs to Authors module.
Let's create a new resolver for BookType in the AuthorsModule and call it BookAuthorsResolver.
We can then use a @ResolveField which allows us to implement this logic inside the resolver. It gives us access to the book object and we can then use it to filter by author.
Now it should be clear what to do in the AuthorService.
Let's update the Author repository data to include the book Ids field.
Add this to the service etc as well. Now we can test it in the GraphQL playground. Don't forget to add the new BookAuthorsResolver to the providers field of AuthorsModule.